on
Implementing 2FA Login With Email On AWS Cognito Using Typescript
Security has become a huge deal in today’s computing world, and one part of security is authentication, in other words proving that you are the person you say you are. For computer systems a username and passoword is enough to authenticate a user, however that has proven to be insufficient for today. That led to 2FA solutions (2 Factor Authentication) which add one more layer of security in the process of identifying a user and basically giving access to certain resource like your bank account, or your email.
The main way 2FA is implemented is by using a secondary channel to provide proof i.e. an extra passcode. That secondary channel has various forms: 1) receive a code on e-mail, 2) receive a code via SMS, 3) use an external app that’s associated with your account e.g. Google Authenticator, 4) hardware keys e.g. Yubico. Probably there are other solutions, but these are the ones that I know and have used in the past.
To cut things short this article is about how to implement a 2FA solution using AWS Cognito, AWS Lambda and mail to build a complete solution for that.
NOTE: you need prior understanding of AWS Cognito and it’s concepts, this is not a full guide on that
Before you begin ensure you have aws cognito enabled and you have setup something that works.
How
Here you will see the code for three lambdas which are required to have a usuable implementation.
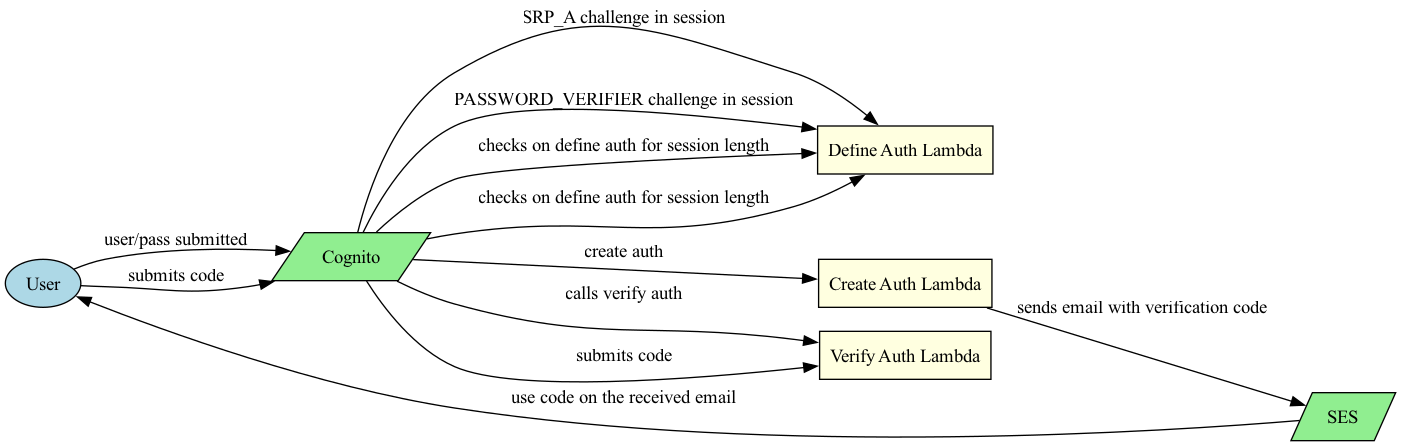
Cognito has a rather simple flow, with a few steps. The idea behind is a request/response challenge where every step of the challenge is defined by you with a single lambda. Let’s a explain the picture above. You need to implement 3 lambda functions that will be assigned to the following:
- Define auth challenge lambda trigger
- Create auth challenge lambda trigger
- Verify auth challenge lambda trigger
Quick AWS Setup
- Go to AWS Cognito
- Select User Pools
- Select your user pool (in my example is
test-pool). - Go to the tab
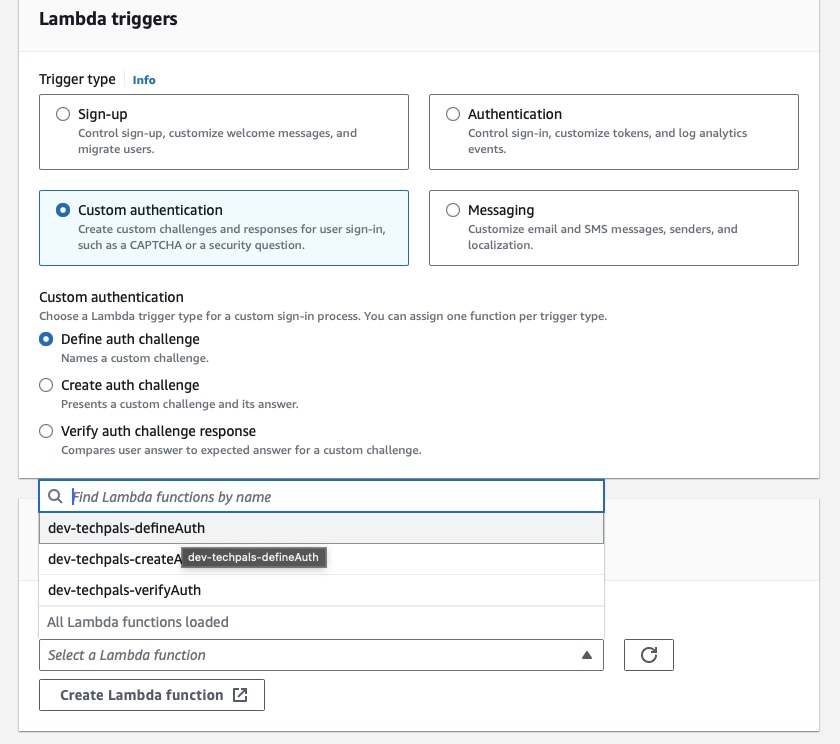
"User pool properties" - Then click on “Add Lambda Trigger”
- Select “Custom authentication”
- Select “Define auth challenge”
- Finally select or create an empty lambda from the next section “Lambda function” and click “Add Lambda Trigger” - basically you can see how it looks like in the picture below.
- Repeat the previous step (8) 2 more times for the rest of the lambda triggers, i.e. Create Auth and Verify Auth.
Now let’s move to the code for each lambda trigger.
Define Auth Challenge - The Code
This lambda function is responsible for defining how the challenge proceeds. Basically it defines the steps of the next challenge based on the current challenge received. Hence this function is called way more times than every other lambda. Also, this lambda function controls verification attempts.
Create a file defineAuth.ts and add the following (typescript) code.
const SRP_A = 'SRP_A';
const PASSWORD_VERIFIER = 'PASSWORD_VERIFIER';
const CUSTOM_CHALLENGE = 'CUSTOM_CHALLENGE';
const MAX_ATTEMPTS = 5;

import { DefineAuthChallengeTriggerEvent, DefineAuthChallengeTriggerHandler } from 'aws-lambda';

export async function handler(event: DefineAuthChallengeTriggerEvent) {
  const { session } = event.request;
  if (isSRPChallenge(session)) { // This is the initial challenge that sets the next step
    respond(event, false, false, PASSWORD_VERIFIER);
  } else if (isPasswordVerifierChallenge(session)) { // if user submitted the his/her password correctly then set the next challenge
    respond(event, false, false, CUSTOM_CHALLENGE);
  } else if (isCustomChallenge(session, false)) { // 3 failed attempts
    respond(event, false, true);
  } else if (session.slice(-1)[0].challengeName === CUSTOM_CHALLENGE && session.slice(-1)[0].challengeResult === true) {
    // SUCCESS: User entered the correct OTP. Issue tokens and authenticate.
    respond(event, true, false);
  } else {
    // User did not provide a correct answer yet.
    respond(event, false, false, CUSTOM_CHALLENGE);
  }

  return event;
}

function isSRPChallenge(session: Array<ChallengeResult | CustomChallengeResult>) {
  return
    session.length === 1 &&
    session[0].challengeName === SRP_A &&
    session[0].challengeResult === true;
}

function isPasswordVerifierChallenge(session: Array<ChallengeResult | CustomChallengeResult>) {
  return
    session.length === 2 &&
    session[1].challengeName === PASSWORD_VERIFIER &&
    session[1].challengeResult === true;
}

function isCustomChallenge(
  session: Array<ChallengeResult | CustomChallengeResult>,
  expectedResult: boolean
) {
  return
    session.length >= MAX_ATTEMPTS &&
    session.slice(-1)[0].challengeName === CUSTOM_CHALLENGE &&
    session.slice(-1)[0].challengeResult === expectedResult;
}

function respond(
  event: DefineAuthChallengeTriggerEvent,
  issueTokens: boolean,
  failAuth: boolean,
  nextChallenge?: string
) {
  event.response.issueTokens = issueTokens;
  event.response.failAuthentication = failAuth;
  if (nextChallenge) {
    event.response.challengeName = nextChallenge;
  }
}
Create Auth Challenge - The Code
The following lambda is called after the SRP_A and PASSWORD_VERIFIER challenge,
which means that we will have 2 sessions already in the list. It’s purpose is to
generate the OTP passcode and a timestamp of creation of the OTP. The OTP is
obviously needed so it’s send to the user and then it’s send to the next lambda,
for verification. The timestamp on the other hand is used to ensure the OTP is not
too old.
The important distinction we need to make here is that there are privateChallengeParameters
which are important for the Verify Auth Trigger.
Add the next piece of code in createAuth.ts file.
const EXPIRATION_OFFSET_IN_MS = 1000 * 60;

import { CreateAuthChallengeTriggerEvent } from 'aws-lambda';

function generateOTP() {
  return Math.floor(10000 + Math.random() * 90000).toString();
}

async function sendEmail(recipient: string, subject: string, body: string) {
  // Send email using ses, nothing really special other than creating a client.
}

export async function handler(event: CreateAuthChallengeTriggerEvent) {
  const { session, userAttributes } = event.request;

  let otp = '';
  if (session.length === 2) { // We have reached the step to generate OTP
    otp = generateOTP();

    const recipient = userAttributes['email'];

    await sendEmail(recipient, 'Your otp', otp);
  } else {
    otp = session.slice(-1)[0].challengeMetadata;
  }

  // set the private challenge parameters, the verification code and the when
  // the code was requested these values will be passed on another lambda
  event.response.privateChallengeParameters = {
    otp,
    timestamp: new Date().toUTCString()
  };

  event.response.challengeMetadata = code;

  return event;
}
Verify Auth Challenge - The Code
Add the next piece of code in verifyAuth.ts file. The following lambda is used to verify the validity
of the verification code and whether the code has expired or not.
import { VerifyAuthChallengeResponseTriggerEvent } from 'aws-lambda';

function hasExpired(timestamp: Date, offset: number) {
  return new Date().getTime() - offset > timestamp.getTime();
}

export async function handler(event: VerifyAuthChallengeResponseTriggerEvent) {
   // Check if the verification code matches the one in the
  // privateChallengeParameters
  const answer = event.request.privateChallengeParameters['otp'];
  const timestamp = event.request.privateChallengeParameters['timestamp'];

  if (timestamp && hasExpired(new Date(timestamp), Number(EXPIRATION_OFFSET_IN_MS))) {
    event.response.answerCorrect = false;
    return event;
  }

  // Respond ↩️
  event.response.answerCorrect = event.request.challengeAnswer === answer;
}
The last piece needed for this to work is to update your UI application. The change needed is
rahter simple. You just need to specify in the amplify config that the authenticationFlowType
is set to CUSTOM_AUTH and then cognito will be able to trigger the above functions.
// ui config
const authConfig = {
    Auth: {
        region: 'eu-central-1',
        ...
        authenticationFlowType: 'CUSTOM_AUTH'
    }
}
Final
Ensure you deploy the lambda triggers in the way you prefer and then you can ensure that this by using the new authentication config in your UI application.